I really like remote controlled stuff, especially planes, but I don’t own a remote control anymore..
Motivation
But what I do own, is knowledge about ROS, raspberry pies, microcontrollers, RF-modules and 2 Xbox controllers. So why not just build it myself instead of buying a 50 Dollar one of Hobbyking? Actually I don’t know.
Whatever, take me to the TR:DL already
Connecting an Xbox controller to the RaspberryPi Zero
Now I wanted to use bluetooth to avoid having to fiddle with that micro USB port and have a lots of cables on my remote. A short search provided me with a tutorial … which of course didn’t work. But at least it was a start. Looking through what I did and could achieve, I searched and found another post.
- install the Xbox driver, for good measure
sudo apt install xboxdrv - permanently disable Bluetooth ertm. Only if you don’t want to use the pi for anything else Bluetooth related!
- create a config file
sudo nano /etc/modprobe.d/bluetooth.conf - add the option
options bluetooth disable\_ertm=Y - reboot
- create a config file
- pair the controller using the Bluetooth tool
sudo bluetoothctldefault-agenscan on- watch the output and press the pairing button on the controller, identify it’s id
- and it still doesn’t work, but we got a little further this time.
[bluetooth]# connect 98:7A:14:B6:71:47
Attempting to connect to 98:7A:14:B6:71:47
[CHG] Device 98:7A:14:B6:71:47 Connected: yes
[CHG] Device 98:7A:14:B6:71:47 Modalias: usb:v045Ep02E0d0903
[CHG] Device 98:7A:14:B6:71:47 Modalias: usb:v045Ep02FDd0903
[CHG] Device 98:7A:14:B6:71:47 UUIDs: 00001124-0000-1000-8000-00805f9b34fb
[CHG] Device 98:7A:14:B6:71:47 UUIDs: 00001200-0000-1000-8000-00805f9b34fb
[CHG] Device 98:7A:14:B6:71:47 ServicesResolved: yes
[CHG] Device 98:7A:14:B6:71:47 Paired: yes
Failed to connect: org.bluez.Error.Failed
[CHG] Device 98:7A:14:B6:71:47 ServicesResolved: no
[CHG] Device 98:7A:14:B6:71:47 Connected: no
[bluetooth]# trust 98:7A:14:B6:71:47
Changing 98:7A:14:B6:71:47 trust succeeded
[bluetooth]# connect 98:7A:14:B6:71:47
Attempting to connect to 98:7A:14:B6:71:47
[CHG] Device 98:7A:14:B6:71:47 Connected: yes
Failed to connect: org.bluez.Error.Failed
[CHG] Device 98:7A:14:B6:71:47 Connected: no
[bluetooth]#
After searching about it to no avail, I removed the device completely remove 98:7A:14:B6:71:47, and started the pairing again. This time it worked! Now in the /dev/input I can see js0 and play with it running jstest
pi@remo:~ $ ls /dev/input/
event0  js0  mice
pi@remo:~ $ ls -la /dev/input/
total 0
drwxr-xr-x  2 root root     100 Dec  4 19:51 .
drwxr-xr-x 16 root root    3660 Dec  4 19:51 ..
crw-rw----  1 root input 13, 64 Dec  4 19:51 event0
crw-rw----  1 root input 13,  0 Dec  4 19:51 js0
crw-rw----  1 root input 13, 63 Dec  4 19:00 mice
pi@remo:~ $ groups
pi adm dialout cdrom sudo audio video plugdev games users input netdev gpio i2c spi
pi@remo:~ $ jstest /dev/input/js0
Driver version is 2.1.0.
Joystick (Xbox Wireless Controller) has 8 axes (X, Y, Z, Rz, Gas, Brake, Hat0X, Hat0Y)
and 15 buttons (BtnA, BtnB, BtnC, BtnX, BtnY, BtnZ, BtnTL, BtnTR, BtnTL2, BtnTR2, BtnSelect, BtnStart, BtnMode, BtnThumbL, BtnThumbR).
Testing ... (interrupt to exit)
Axes:  0:     0  1:     0  2:     0  3:     0  4:     0  5:     0  6:     0  7:     0 Buttons:  0:off  1:off  2:off  3:off  4:off  5:off  6:off  7:off  8:off  9:off 10:off 11:off 12:off
After a while, the controller turned off and when I turned it back on, it didn’t automatically connect. Instead, I saw these errors and used bluetoothctl again.
pi@remo:~ $ systemctl status bluetooth.service
● bluetooth.service - Bluetooth service
   Loaded: loaded (/lib/systemd/system/bluetooth.service; enabled; vendor preset: enabled)
   Active: active (running) since Fri 2020-12-04 19:00:17 JST; 2h 13min ago
     Docs: man:bluetoothd(8)
 Main PID: 400 (bluetoothd)
   Status: "Running"
    Tasks: 1 (limit: 881)
   CGroup: /system.slice/bluetooth.service
           └─400 /usr/lib/bluetooth/bluetoothd

Dec 04 21:12:58 remo bluetoothd[400]: Authentication attempt without agent
Dec 04 21:12:58 remo bluetoothd[400]: Access denied: org.bluez.Error.Rejected
Dec 04 21:13:05 remo bluetoothd[400]: Authentication attempt without agent
Dec 04 21:13:05 remo bluetoothd[400]: Access denied: org.bluez.Error.Rejected
Dec 04 21:13:11 remo bluetoothd[400]: Authentication attempt without agent
Dec 04 21:13:11 remo bluetoothd[400]: Access denied: org.bluez.Error.Rejected
Dec 04 21:13:17 remo bluetoothd[400]: Authentication attempt without agent
Dec 04 21:13:17 remo bluetoothd[400]: Access denied: org.bluez.Error.Rejected
Dec 04 21:13:24 remo bluetoothd[400]: Authentication attempt without agent
Dec 04 21:13:24 remo bluetoothd[400]: Access denied: org.bluez.Error.Rejected
… and starting the agent and typing yes in bluetoothctl…
pi@remo:~ $ sudo bluetoothctl
Agent registered
[CHG] Device 98:7A:14:B6:71:47 Connected: yes
[CHG] Device 98:7A:14:B6:71:47 Connected: no
[CHG] Device 98:7A:14:B6:71:47 Connected: yes
[CHG] Device 98:7A:14:B6:71:47 Connected: no
[CHG] Device 98:7A:14:B6:71:47 Connected: yes
[CHG] Device 98:7A:14:B6:71:47 Connected: no
[CHG] Device 98:7A:14:B6:71:47 Connected: yes
[CHG] Device 98:7A:14:B6:71:47 Connected: no
[CHG] Device 98:7A:14:B6:71:47 Connected: yes
[Xbox Wireless Controller]# default-agent
Default agent request successful
[CHG] Device 98:7A:14:B6:71:47 Connected: no
[CHG] Device 98:7A:14:B6:71:47 Connected: yes
Authorize service
[agent] Authorize service 00001124-0000-1000-8000-00805f9b34fb (yes/no): yes
[Xbox Wireless Controller]#
…fixed it. Now, after a reboot I would have to repeat this step of manually connecting. But it can be circumvented by issuing the trust command in bluetoothctl.
Reading the Controller using ROS
First, I had to build ROS from the sources, which took quite long on that single core pi-zero, but utilizing only one thread, at least it didn’t run out of RAM and crash. They warned about that in the manual. During building ROS, also make sure to include the ROS joystick_drivers package, else you need to rebuild the entire thing. Yes, I forgot
Edit: Because it was so much fun, after almost finishing the project, I decided to switch the ROS distro to noetic
The short tutorial on how to build ROS WITH the joystick support goes as follows:
sudo sh -c 'echo "deb http://packages.ros.org/ros/ubuntu $(lsb_release -sc) main" > /etc/apt/sources.list.d/ros-latest.list'
sudo apt-key adv --keyserver hkp://ha.pool.sks-keyservers.net:80 --recv-key C1CF6E31E6BADE8868B172B4F42ED6FBAB17C654
sudo apt update
sudo apt-get install python3-rosdep python3-rosinstall-generator python3-vcstool build-essential
mkdir ros_noetic && cd ros_noetic
sudo rosdep init
rosdep update
At this point, we need to select packages to include for the source checkout. More can be found here..
- Basic, just ros_comm tools and other basic stuff + joystick
rosinstall_generator robot joystick_drivers --rosdistro noetic --deps --wet-only --tar > my_ros.rosinstall - Basic + Mobile + perception, but also with some more things, that could be useful for a driving robot
rosinstall_generator mobile perception joystick_drivers --rosdistro noetic --deps --wet-only --tar > my_ros.rosinstall - Desktop,
rosinstall_generator desktop joystick_drivers --rosdistro noetic --deps --wet-only --tar > my_ros.rosinstall - Desktop-full no SIM, the actual desktop one should install. Contains everything, except simulators (didn’t build)
rosinstall_generator desktop navigation slam_gmapping perception joystick_drivers --rosdistro noetic --deps --wet-only --tar > my_ros.rosinstall
And finally, install dependencies and build it. Notice the -j1 in the last command, that’s the amount of threads to use during build. adjust according to your machine.
wstool init src my_ros.rosinstall
# mkdir ./src && vcs import --input my_ros.rosinstall ./src
rosdep install --from-paths ./src --ignore-packages-from-source --rosdistro noetic -y -r --os=debian:buster
sudo ./src/catkin/bin/catkin_make_isolated --install -DCMAKE_BUILD_TYPE=Release -DPYTHON_EXECUTABLE=/usr/bin/python3 --install-space /opt/ros/noetic -j1
But now I can just run these commands in different terminals and get the reading of the controller as nicely formatted ROS messages
roscore &
rosparam set joy_node/dev "/dev/input/jsX"
rosrun joy joy_node
pi@remo:~ $ rostopic echo joy
header:
  seq: 1293
  stamp:
    secs: 1607084977
    nsecs: 765009929
  frame_id: "/dev/input/js0"
axes: [-0.0, -0.0, -0.0, -0.0, 1.0, 1.0, 0.0, 0.0]
buttons: [0, 0, 0, 0, 0, 0, 0, 0, 0, 0, 0, 0, 0, 0, 0]
---
Now, putting that in some launch file with additional options, this node will be the foundation of the remote control, sending commands at a constant rate, the rest of the system will rely on those to do anything. I choose 50Hz as it was a common update frequency back in the days of 35MHz remotes.
<launch>
  <node pkg="joy" name="main_joystick" type="joy_node">
    <param name="dev" value="/dev/input/js0" />
    <!-- its a percentage value between 1 and 0-->
    <param name="deadzone" value="0.05" />
    <!-- HZ rate of resending even when the joy didn't change. double type:  0.0 == disable -->
    <param name="autorepeat_rate" value="50.0" />
    <!-- value in seconds to bundle axis events in a single message -->
    <param name="coalesce_interval" value="0.02" />
  </node>
</launch>
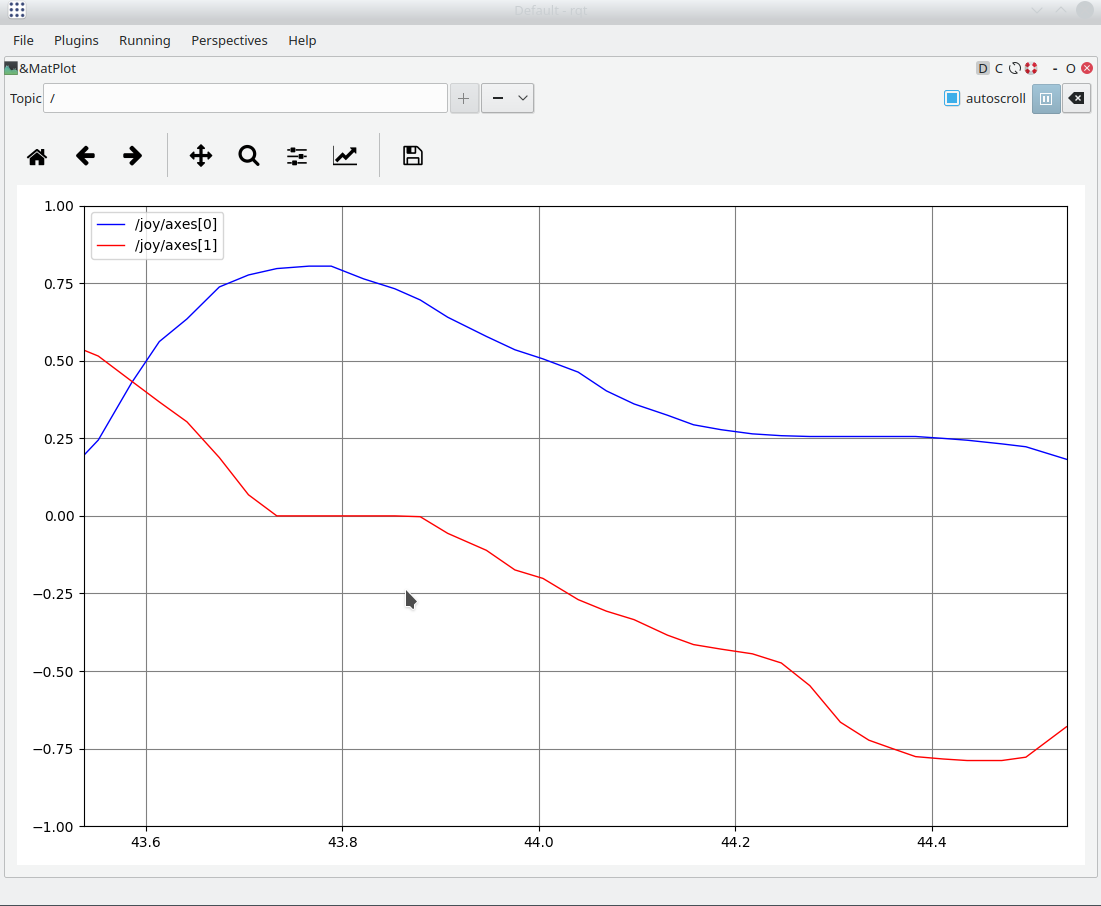
And running rqt_plot on my development machine I can see more or less smooth graphs of the joystick moving. Next I will implement some nodes to limit the rates, maybe exponential curves and finally translate it to something the servos on the car will understand, including min / max values and an adjustable center point for the final PWM signal.
Modifying the controller signal
Because I want the typical configurations available in modern computer remote controls, I started to work on a framework for manipulating the signal. The idea is, that I simply chain filters until I get the desired signal. And because testing with the controller is cumbersome, I implemented a Signal generator within that framework. It simply sends a message that counts up or down, amount can be adjusted.
Now my idea for the filter chain is
- Source
- Exponential
- CenterOffset / Trim (moving the center point)
- at this point could be something like a Mixer between channels
- DualRate / Limit (scaling for maximum value on each side of the stick)
- PWM-Conversion (also scaling, so this could be done in the Limit Node as well.
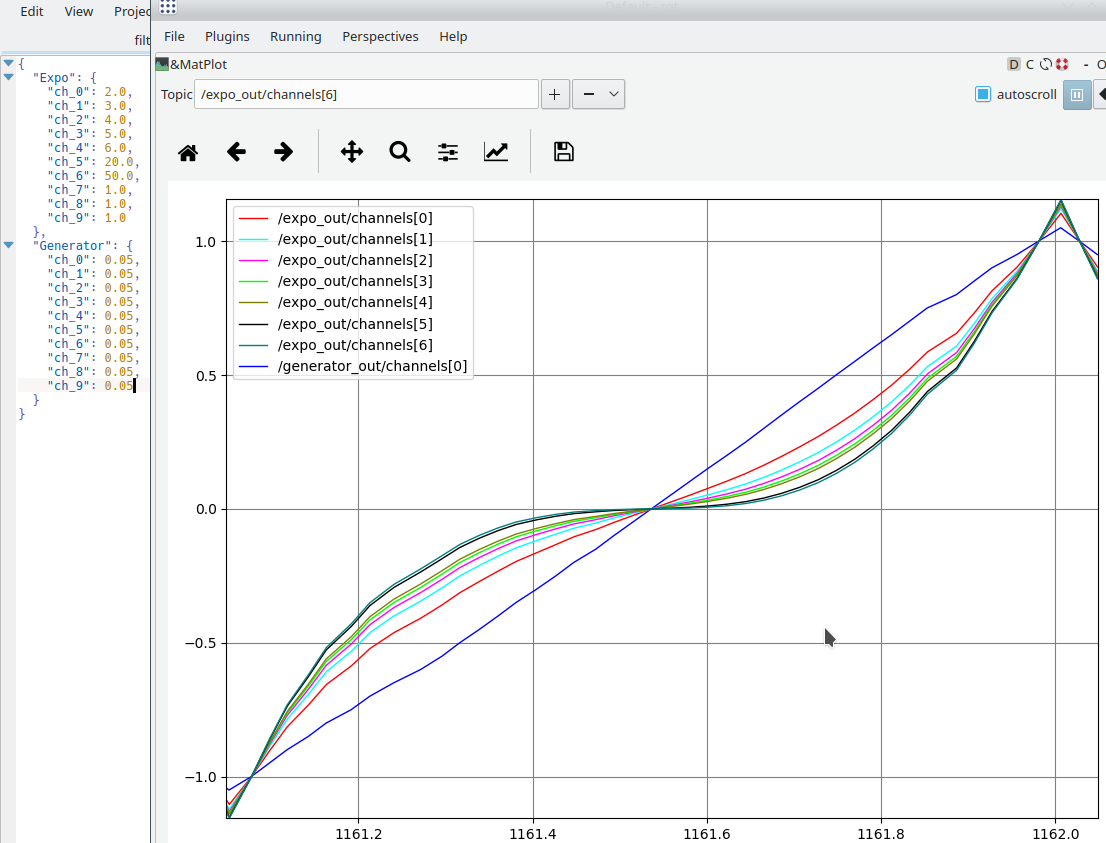
And I need to come up with a simple mechanic to use the backside triggers in there. They are going from -1 to 1, too, but adding exponential as it is would mean they get smooth around the center, and quick at both ends. I am not sure, if that’s good or not. However, the first try at an exponential function looks good, just the diminishing returns when increasing the value need maybe a change.
<launch>
	<node pkg="remo_filters" name="signal_generator" args="generator" type="node" output="screen"/>
	<node pkg="remo_filters" name="filter_expo" args="expo generator" type="node" output="screen"/>
</launch>
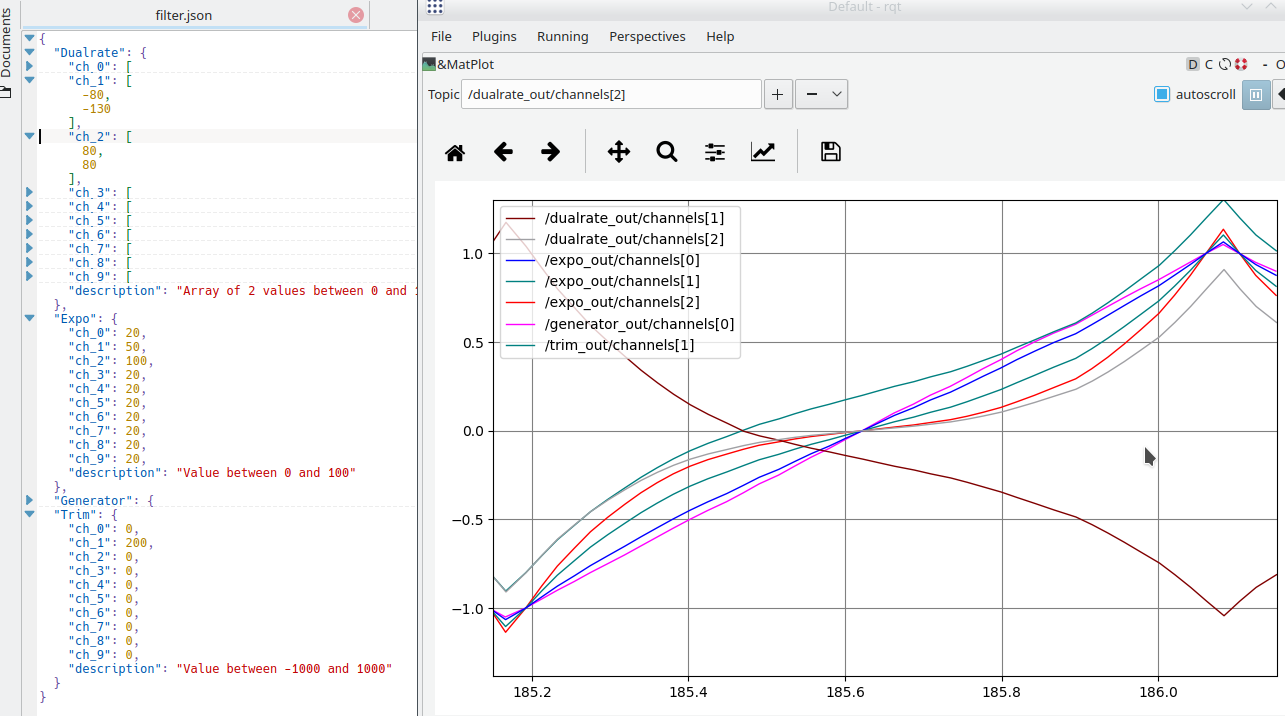
I implemented the trim/offset filter and the Dualrate, which took just less than an hour while even adding some new functionality to the base class of the filter pipeline. Dualrate can also be used to reverse the servos, and in a future update will also directly calculate the appropriate PWM signal. Basically that is just x * 400 + 1500 to get the microsecond value of the on time anyway.
TO BE CONTINUED
TL;DR
Maybe there won’t be a TLDR for this post.